How to Track Website Visitors and Grow Your Site
If you want to track website visitors effectively, you need more than just a tool like Google Analytics. You need a game plan. It's not about watching pageview counters spin; it’s about piecing together the entire user journey, from the first click to the final handshake, and then taking action on what you find.
Why Tracking Website Visitors Matters

Before you even think about dropping a tracking script on your site, let's get the 'why' straight. This isn't about hoarding data. It's about turning raw numbers into a clear story of how real people interact with your brand online. When you learn how to track website visitors, you stop making guesses and start making smart, informed decisions that directly impact your bottom line.
This stuff didn't just appear overnight. Back in the 1990s, the best we could do was scan server log files to count 'hits'—which were really just file requests. By the late '90s, the game changed with JavaScript-based tracking. Suddenly, we could see browsers, screen sizes, and the actual paths people took through a site. That leap forward set the stage for the powerful platforms we rely on today.
Distinguishing Between Data and Insights
At its core, website tracking is about one thing: separating anonymous traffic from identified leads.
Anonymous traffic is everyone who visits your site whose name you don't know. But you can still learn a ton from their behavior—what pages they look at, how long they stay, and where they came from.
Identified leads are the people who raise their hand. They fill out a form, subscribe to a newsletter, or request a demo. They give you a direct line of contact.
Understanding this difference is the first step to personalizing their experience and tightening up your marketing funnel. The entire goal is to guide those anonymous visitors toward an action that turns them into a known contact.
What You Can Genuinely Learn
When your tracking is set up correctly, you unlock a treasure trove of information that directly shapes your strategy. You move beyond surface-level metrics and start seeing the real patterns.
Here's what you can actually uncover:
- Popular Content and Dead Ends: Pinpoint which pages are your superstars and which ones are causing people to hit the back button and leave for good. Actionable Step: Use this data to feature your popular content more prominently and create an improvement plan for underperforming pages.
- User Journey Mapping: Trace the exact steps someone takes, from landing on a blog post via Google to filling out your demo request form. This is pure gold. Actionable Step: Identify common drop-off points in the journey and optimize those pages to keep users moving toward conversion.
- Audience Demographics: Get a clear picture of your visitors' locations, the devices they prefer (mobile vs. desktop), and even their browsers. This helps you optimize your site's design and performance where it counts. Actionable Step: If 70% of your traffic is mobile, prioritize a mobile-first redesign.
This table breaks down some of the most critical metrics and why they should be on your radar.
| Key Visitor Metrics and Their Business Impact |
|---|
| Metric |
| Sessions |
| Bounce Rate |
| Average Session Duration |
| Pages per Session |
| Conversion Rate |
Tracking these metrics gives you the hard data you need to not only improve your website but also to justify your marketing spend.
By connecting specific visitor actions to real business outcomes, you can confidently calculate what’s working and what isn’t. Our guide on how to calculate marketing ROI dives much deeper into this crucial process.
When you focus on these foundational concepts, you'll build a tracking strategy that delivers real growth—not just a dashboard full of vanity metrics.
Comparing Core Website Tracking Methods
Deciding how to track visitors on your website isn't a simple, one-size-fits-all choice. The right approach really depends on what you're trying to achieve, your tech stack, and how seriously you take user privacy. Getting a handle on the core methods is the first real step toward building a tracking strategy that gives you data you can actually trust.
Most people start with client-side tracking. It's the classic setup you get out of the box with tools like Google Analytics. A little snippet of JavaScript runs in your visitor's browser (the "client"), collects info, and sends it straight to the analytics platform. It's pretty easy to set up and great for capturing rich, real-time user interactions like mouse clicks and form entries.
But this approach has some serious weaknesses. Because it all happens in the browser, it's easily blocked. Ad-blockers and privacy-first browsers can stop your script from ever loading, making a chunk of your audience completely invisible. And it's not a small chunk—recent data shows nearly 43% of internet users worldwide use an ad-blocker. That's a massive blind spot.
Server-Side Tracking for a Truer Picture
This is where server-side tracking comes in. Instead of running everything in the user's browser, you move the data collection process to your own web server. When a visitor does something on your site, their browser sends a request to your server first. Then, your server forwards that information to your analytics tools. It creates a much more direct and controlled data stream.
This method is just inherently more reliable. It’s completely immune to browser-based ad-blockers and sidesteps many of the cookie restrictions that trip up client-side scripts. The result is a far more complete and accurate dataset, giving you a much truer picture of your actual website traffic.
Key Takeaway: Server-side tracking puts you back in control of your data. By processing information on your own server before passing it to third-party tools, you can filter, enrich, and manage what gets shared—boosting both accuracy and privacy.
To make it more concrete, here’s how these two methods really stack up against each other.
Client-Side vs Server-Side Tracking A Practical Comparison
This table directly compares the two primary tracking methodologies to help you decide which approach, or combination of approaches, is right for your needs.
| Feature | Client-Side Tracking (e.g., GA4 via Browser) | Server-Side Tracking (e.g., via GTM Server Container) |
|---|---|---|
| Implementation | Easier and quicker to set up; often just adding a script to your site's header. | More complex setup requiring a server environment and technical configuration. |
| Data Accuracy | Susceptible to ad-blockers, browser restrictions, and network issues, leading to data loss. | Highly accurate and resilient to ad-blockers, providing a more complete dataset. |
| Site Performance | Can slow down page load times by adding multiple third-party scripts to the browser. | Minimal impact on site speed as the heavy lifting is done on the server, not the user's device. |
| Data Control | Data is sent directly from the user's browser to third-party vendors with less oversight. | You control the data flow, allowing for filtering and enrichment before sending it to vendors. |
| Cost | Generally lower initial setup cost, often included with free analytics tools. | Involves server hosting costs, which can vary based on traffic volume. |
Ultimately, many teams find a hybrid approach works best, using server-side for core analytics and client-side for specific user experience tools. For a deeper dive into how different platforms handle this, there's a great resource offering a detailed comparison of Sitecore CDP Personalize and Google Analytics.
Don't Forget Pixels and UTMs
Beyond these core architectures, two other tools are absolutely essential for any serious marketer: tracking pixels and UTM parameters.
-
Tracking Pixels: These are tiny, invisible 1x1 pixel images placed on your website. When a page with a pixel loads, it "fires" and sends data back to an ad platform like Meta or LinkedIn. They are absolutely critical for tracking ad conversions and building retargeting audiences.
-
UTM Parameters: Think of these as simple tags you tack onto the end of a URL to see how your campaigns are performing. By tagging links from emails, social posts, or paid ads, you can tell your analytics tool exactly where a visitor came from. This is fundamental for figuring out which channels are actually driving results and which are just noise.
Connecting all these dots to correctly attribute conversions is a huge challenge. To get a better handle on how to build a cohesive picture from these data points, check out our guide on multi-touch attribution models. Choosing the right mix of these methods will be the difference between guessing and knowing what works.
Getting Started with Google Analytics 4
Let's be honest: setting up website tracking usually starts with Google Analytics 4. It’s the industry gorilla for a reason, but a sloppy setup is a fast track to messy, unreliable data. If you get one thing right, make it the initial configuration.
It's no secret that Google Analytics is everywhere—more than 50 million websites use it to understand what visitors are doing. The latest version, GA4, gives you a granular look at user behavior, from session counts and page views to actual conversion rates. For context, the average session duration on most sites is around 2-3 minutes, though that number swings wildly depending on your industry. If you want to dive deeper into the different tools out there, Tidio.com has some good insights on visitor tracking tools.
This guide will walk you through the three main ways to get the GA4 tracking tag on your site. The goal is to start collecting clean, actionable data from the moment you flip the switch.
First, Create Your GA4 Property
Before you can track anything, you need a home for your data. In GA-speak, this is your "property."
- Sign in to Google Analytics: If you’re new, you’ll be walked through creating an account.
- Head to the Admin section: Look for the gear icon in the bottom-left corner.
- Create a new property: Give it a sensible name (like "YourCompany Website"), pick your reporting time zone and currency, and just follow the prompts.
After you create the property, Google will prompt you to set up a "data stream." This is the pipeline that funnels data from your website into your GA4 property. Here, you'll find your Measurement ID, which is a unique code that looks like G-XXXXXXXXXX.
The basic flow of information is pretty simple: it goes from the user's browser (client-side) to your backend systems and analytics platforms (server-side).
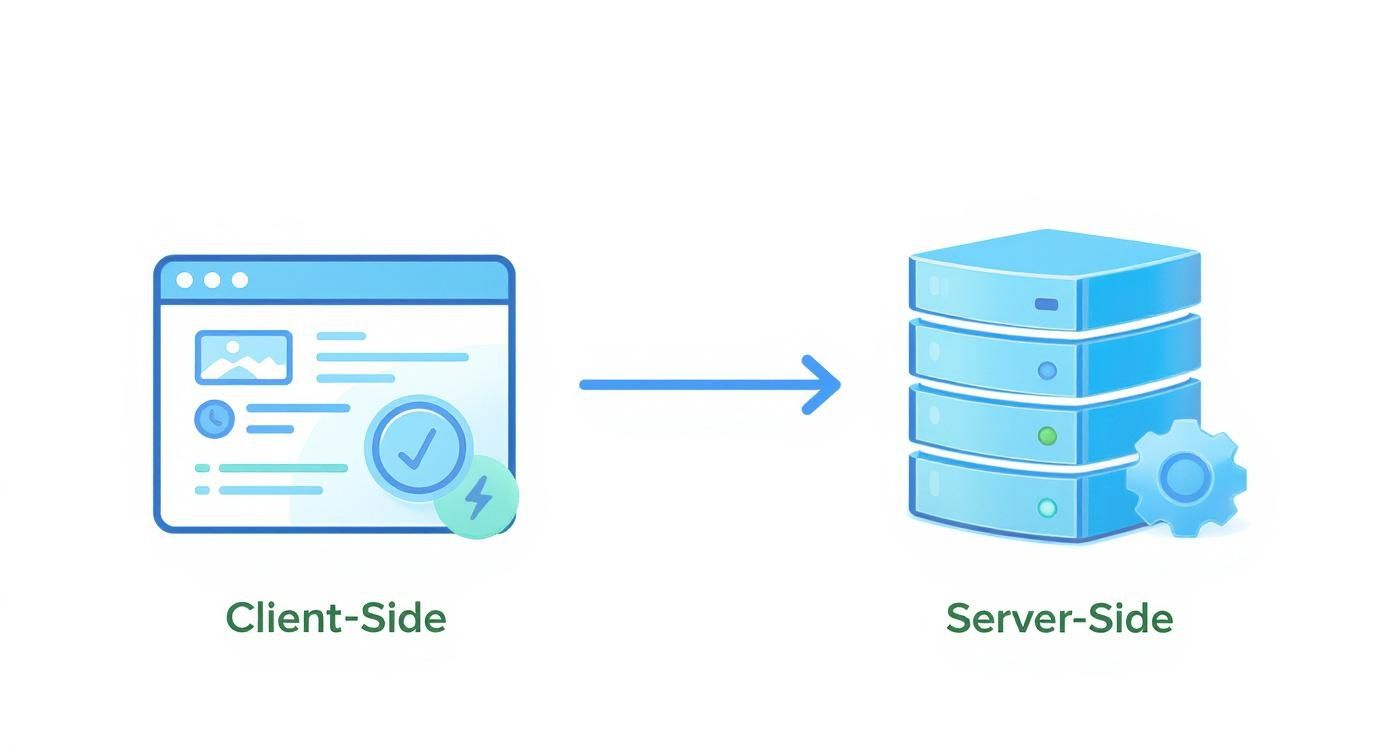
Understanding this helps you pick the right installation method, letting you balance how easy the setup is with how accurate you need your data to be.
Choosing Your Installation Method
You’ve got three main options for getting the tracking code live. Your choice really boils down to your technical comfort level and what platform your website is built on.
| Installation Method | Best For | Pros | Cons |
|---|---|---|---|
| Direct HTML Insertion | Simple, static websites or developers who want direct control. | Fast and straightforward; no extra plugins needed. | Requires editing code; can be overwritten by theme updates. |
| CMS Plugin (e.g., WordPress) | Beginners and users of platforms like WordPress, Shopify, or Wix. | Very easy to install; no coding required and often includes extra features. | Adds another plugin to manage; may have limited customization options. |
| Google Tag Manager (GTM) | Marketers and teams who manage multiple tracking scripts (e.g., GA4, Meta Pixel). | The most flexible and scalable method; centralizes all tags. | Steeper learning curve; initial setup is more involved. |
For most marketing pros, my recommendation is almost always Google Tag Manager. Yes, it takes a bit more effort upfront, but the long-term payoff is huge. It lets you add, edit, and remove tracking codes for all your marketing tools without ever having to file a ticket with a developer. You get full control.
Pro Tip: As soon as you set up your GA4 property, go to Data Settings > Data Retention. Change the event data retention from the default of 2 months to 14 months. This is critical for doing any kind of year-over-year analysis later on.
Key Configuration Settings to Check�
Once your tag is installed and data starts flowing, a couple of initial settings are crucial for keeping that data clean.
- Enable Google Signals: This one is a must. It collects aggregated, anonymous data from users who are signed into their Google accounts and have Ads Personalization on. This is how GA4 pieces together cross-device user journeys, giving you a much clearer picture of how a single person interacts with your site on their phone, then their laptop, then their tablet.
- Define Internal Traffic: You and your team are visiting your site all the time. To avoid skewing your data, create a filter to exclude traffic from your office IP addresses. This keeps your reports focused on actual customers and prospects.
By taking these first steps thoughtfully, you’re building a solid foundation. You'll go from having zero visibility into your site’s performance to having a reliable system for tracking visitors and gathering the insights you need to make smarter business decisions.
Tracking Actions That Actually Drive Growth
Knowing someone landed on your site is one thing. Knowing what they did once they got there is where the money is. If you want to track website visitors in a way that actually sharpens your strategy, you have to look past simple page views and start monitoring the specific interactions—or events—that signal real intent.
It's the difference between knowing someone walked into your store versus knowing they picked up a product, read the label, and headed for the checkout counter. One is a vanity metric; the other is a qualified lead staring you in the face.
Setting Up Meaningful Event Tracking
This is where Google Tag Manager (GTM) becomes your best friend. Think of it as a middleman that lets you set up tracking for specific user actions without constantly bugging your developers to edit the site's code. Instead of just firing a tag on a page load, you can configure triggers for the actions that truly matter.
Here are a few high-value events you should be tracking yesterday:
- Button Clicks: Not all clicks are created equal. Focus on the ones that move people down your funnel, like "Request a Demo" or "Download Case Study."
- Form Submissions: This is the classic conversion. Tracking completions for lead forms, contact forms, or newsletter signups is absolutely non-negotiable.
- Video Engagement: Did someone watch 75% of your product demo? That's a massive buying signal. You can set up triggers to fire at key completion milestones (25%, 50%, 75%, 100%).
- File Downloads: When a visitor grabs a PDF whitepaper or your pricing sheet, they're signaling serious interest. This is a critical micro-conversion.
For example, to track a specific button click in GTM, you’d create a trigger that listens for a click on an element with a specific CSS ID, like id="demo-request-button". You then wire that trigger up to a GA4 event tag, which sends clean, actionable data right into your analytics property.
From Events to Conversions: The Final Step
Capturing events is only half the job. The most crucial part is telling Google Analytics which of these events actually define success for your business. You do this by flagging specific events as conversions right inside the GA4 interface.
By marking an event like "demo_request_form_submit" as a conversion, you elevate it from a simple interaction to a key performance indicator. This is what allows GA4 to attribute these valuable actions back to the specific marketing channels that drove them.
This simple toggle transforms your analytics from a passive data dump into a powerful optimization tool. You can finally see which blog posts, ad campaigns, or social channels are generating actual leads—not just empty clicks.
Of course, once you know what's converting, the next question is always about profitability. It helps to understand the difference between ROI vs ROAS to connect your conversion data to real financial outcomes.
Comparing High-Intent vs. Low-Intent Actions
Let's be clear: not all events carry the same weight. You have to distinguish between actions that show casual interest and those that scream "I'm ready to buy." This distinction is what helps you prioritize your efforts and focus your budget.
| Action Type | Low-Intent Example | High-Intent Example |
|---|---|---|
| Engagement | Scrolling 50% down a blog post | Watching 75% of a product demo video |
| Content | Downloading an introductory guide | Downloading a detailed pricing sheet |
| Contact | Subscribing to a general newsletter | Submitting a "Contact Sales" form |
By focusing your analysis on these high-intent conversions, you get a much cleaner signal of what’s actually working. This is how you turn your website tracking from a passive report into an active growth engine, empowering you to double down on the channels that attract your most valuable customers.
Staying Compliant in a Cookieless World
Knowing how to track visitors is only half the battle. Doing it ethically and legally is where the real work begins. Privacy isn't a checkbox anymore; it’s a core requirement for building trust and ensuring your whole tracking strategy doesn't get wiped out by the next browser update.
Regulations like GDPR in Europe and CCPA in California aren't just suggestions. They're enforceable laws that hand control back to the user.
This isn’t just about government mandates, either. The entire industry is finally moving on from third-party cookies, the tech that powered cross-site tracking for decades. Major browsers are pulling the plug, forcing a pivot toward more transparent, consent-based data collection.
This new reality is forcing businesses to adapt, and fast. The future is being built on first-party data and server-side tracking, with over 70% of businesses expected to adopt server-side methods just to stay in the game. It’s a massive shift toward privacy-first solutions.
Implement a Clear Consent Banner
The first line of defense is a proper consent banner. A lazy, vague "By using this site, you accept cookies" banner just won't cut it anymore. You absolutely need a modern consent management platform (CMP) to give visitors real, granular control.
A compliant banner must:
- Clearly state what you track and why. Ditch the legal jargon. Explain in plain language what data you're collecting and how it helps you.
- Offer a simple 'Accept' and 'Reject' option. The button to opt-out needs to be just as easy to find and click as the one to opt-in. No dark patterns.
- Allow granular control. Let users choose which types of tracking they're okay with (e.g., Analytics, Marketing, Functional) instead of forcing an all-or-nothing decision.
Key Takeaway: Consent is an active agreement, not a passive assumption. Your tracking tags should not fire until a user has explicitly given you the green light. Anything less is a direct risk to your business.
Configure Google Tag Manager Consent Mode
Just having a banner isn’t enough; it has to actually do something. This is where Google Tag Manager's Consent Mode becomes your best friend. It acts as a gatekeeper, changing how your Google tags (like GA4 and Google Ads) behave based on what the user chooses.
When a user says yes, the tags fire normally. When they say no, Consent Mode sends anonymous, cookieless pings to Google. This clever workaround allows you to model conversion data from non-consenting users without stomping all over their privacy choices. It’s a vital middle ground that helps you fill in reporting gaps ethically.
Adopting Future-Proof Tracking Methods
To get ahead of the curve, you have to look beyond the browser. Two key strategies are paving the way for a compliant, cookieless future.
| Strategy | How It Works | Key Benefit for Compliance |
|---|---|---|
| Server-Side Tracking | Instead of data going from the user's browser straight to Google, it hits your server first. Your server then decides what to forward to third parties. | It gives you absolute control. You can strip out sensitive info before it ever leaves your environment, which massively boosts privacy. |
| Privacy-First Analytics | These are alternatives like Fathom or Plausible built from day one to be cookieless and GDPR-friendly. They only focus on essential, aggregated metrics. | These tools offer a dead-simple, ethical way to see traffic trends without ever collecting personally identifiable information (PII). Compliance is automatic. |
The most durable path forward is combining these tactics with a solid first-party data strategy. Every email you collect from a form or every account created on your site becomes that much more valuable. Getting all that data into one place is critical; our guide on customer data platform integration breaks down how this creates a single, powerful view of your audience.
By respecting user privacy, you're not just following the law—you're building a brand people actually trust.
Answering Your Most Common Visitor Tracking Questions
Even with the best tools in place, some questions always pop up when you're getting serious about tracking visitors. Moving from setup to analysis is a big step, and a few key concepts can trip anyone up.
Getting these fundamentals right is the difference between staring at a dashboard full of numbers and seeing a clear story about what's working. This is your go-to guide for those common sticking points.
What’s the Real Difference Between Users, Sessions, and Pageviews?
It's so easy to glance at these three metrics and think they're basically the same thing. They're not. Understanding the hierarchy is the key to knowing what your traffic reports are actually telling you.
Let’s use a simple analogy. Think of your website as a local coffee shop.
- A User: This is a single, unique person. We'll call him Dave. Dave is one user, no matter how many times he comes in for a latte.
- A Session: This is a single visit to the coffee shop. Dave might stop by on his way to work Monday morning (that’s one session). He might come back Wednesday afternoon for a meeting (that’s a second session). In the web world, a session usually times out after 30 minutes of inactivity.
- Pageviews: These are the individual things Dave does during his visit. On Monday, maybe he just looks at the menu and orders a coffee (two pageviews). On Wednesday, he looks at the menu, orders a coffee, checks out the pastry case, and then looks at the Wi-Fi login page (four pageviews).
So, in our coffee shop story, we have one user (Dave), two sessions (his Monday and Wednesday visits), and a total of six pageviews. Seeing the difference helps you understand not just how many people are showing up, but how often they return and what they do when they’re there.
Can I Actually Track Visitors Without Using Cookies?
Yes, you absolutely can. Cookieless tracking isn't some fringe tactic anymore; it's quickly becoming the standard for any business that takes user privacy seriously. As browsers phase out third-party cookies, having alternatives is non-negotiable.
The most reliable method is server-side tracking. Instead of depending on the visitor's browser to store and send data, you log activity directly on your own web server. This approach is totally immune to cookie blockers and ad blockers, giving you a much more accurate picture of who’s on your site.
Beyond that, a new wave of privacy-first analytics tools has emerged. Platforms like Fathom and Plausible were built from the ground up to give you the essential website insights you need without using a single cookie or collecting personal data. This makes complying with regulations like GDPR a whole lot simpler.
Setting up a server-side container in Google Tag Manager is another fantastic way to reduce your reliance on browser cookies. It gives you direct control over what data gets collected and where it goes, effectively future-proofing your entire analytics stack.
How Do I Know Which of My Marketing Campaigns Are Actually Working?
This is the million-dollar question, and the answer is refreshingly simple: UTM parameters. Think of them as little tracking codes you tack onto the end of your URLs to tell your analytics platform exactly where a visitor came from.
By adding tags like utm_source, utm_medium, and utm_campaign, you can trace every single click back to its origin—whether that's a specific ad, a social media post, or an email newsletter.
For example, a link from a LinkedIn ad campaign might look like this:
yourwebsite.com/landing-page?utm_source=linkedin&utm_medium=cpc&utm_campaign=q4_promo
When you look at your "Traffic acquisition" report in Google Analytics 4, you'll see a perfectly clean breakdown of which sources, mediums, and campaigns are driving traffic. More importantly, you'll see which ones are driving conversions. It’s the single most reliable way to measure your marketing ROI.
Why Does My Website Traffic Data Look... Wrong?
If your numbers just don't feel right, you're probably looking at a configuration issue. Bad data is worse than no data—it can send you on a wild goose chase fixing problems that don't exist while you miss out on real opportunities.
Here are the usual suspects when your data seems off:
- Missing or Duplicate Tracking Code: Your analytics script needs to be on every single page, but only once. A duplicate tag will double-count pageviews and sessions, while a missing tag creates a black hole in your data where users just disappear.
- Forgetting to Filter Internal Traffic: If you haven't excluded IP addresses from your own office (or your remote team), you're counting your own activity. This will kill your conversion rates and make your engagement metrics look much better than they really are.
- Bot Traffic: Unfiltered bots and web crawlers can generate thousands of fake sessions, often with a 100% bounce rate. Most analytics platforms have a simple "bot filtering" checkbox—make sure it's turned on.
- A Bad Cookie Consent Setup: If your consent banner is set up incorrectly, it might be blocking your tracking tags from firing for a huge chunk of your audience. If users don't interact with the banner, they become invisible.
A great first diagnostic step is to use the Google Tag Assistant browser extension. It lets you go page by page and see exactly which tags are firing, which are blocked, and why.
By turning raw data into actionable insights, marketbetter.ai helps you understand not just who your visitors are, but what they need next. Our AI-powered platform optimizes your content and campaigns to engage users at every stage of their journey, turning website traffic into measurable growth. Discover how you can activate your data with marketbetter.ai.